A Technical Breakdown of Talaria
Introduction
In my experience, Laravel stands out as having the most developer-friendly environment, largely thanks to its integration with Flare.
Flare, which you can explore further here, offers an exceptionally elegant and intuitive error tracking system. Beyond its sleek interface, Flare seamlessly integrates with React and Vue applications.
But enough about Flare; let's delve into the primary reason for this post. One standout feature of Flare that I greatly appreciate is its ability to redirect you to the specific error page and line within your text editor. While this feature may seem straightforward, its potential to save an immense amount of time, particularly when navigating through numerous files, cannot be overstated.
Enter Talaria: a tandem of extensions designed to enhance this functionality. One extension operates within the browser (Chrome), serving as the client, while its counterpart resides in VSCode, acting as the server. Here's how it works: the client monitors browser activity, promptly updating its error list upon detection of any issues.
Users can then effortlessly navigate to the server, which not only opens the file containing the error but also directs them to the precise line where the issue occurred.
This seamless integration between browser and editor epitomizes the efficiency and productivity that developers strive for.
Implementation
I often refer to Talaria as a twin extension, as both components work together seamlessly to deliver the required functionality. The primary focus of the implementation lies within the client, which operates as a Chrome extension. Let's delve into the client's implementation details and the rationale behind certain design decisions.
The Client
As mentioned earlier, the client serves as a Chrome extension. Before delving into its implementation specifics, it's helpful to understand the concept of Chrome extensions. Essentially, extensions serve as a means to augment the capabilities of software—in this case, the Chrome browser.
A Brief Overview of the Client
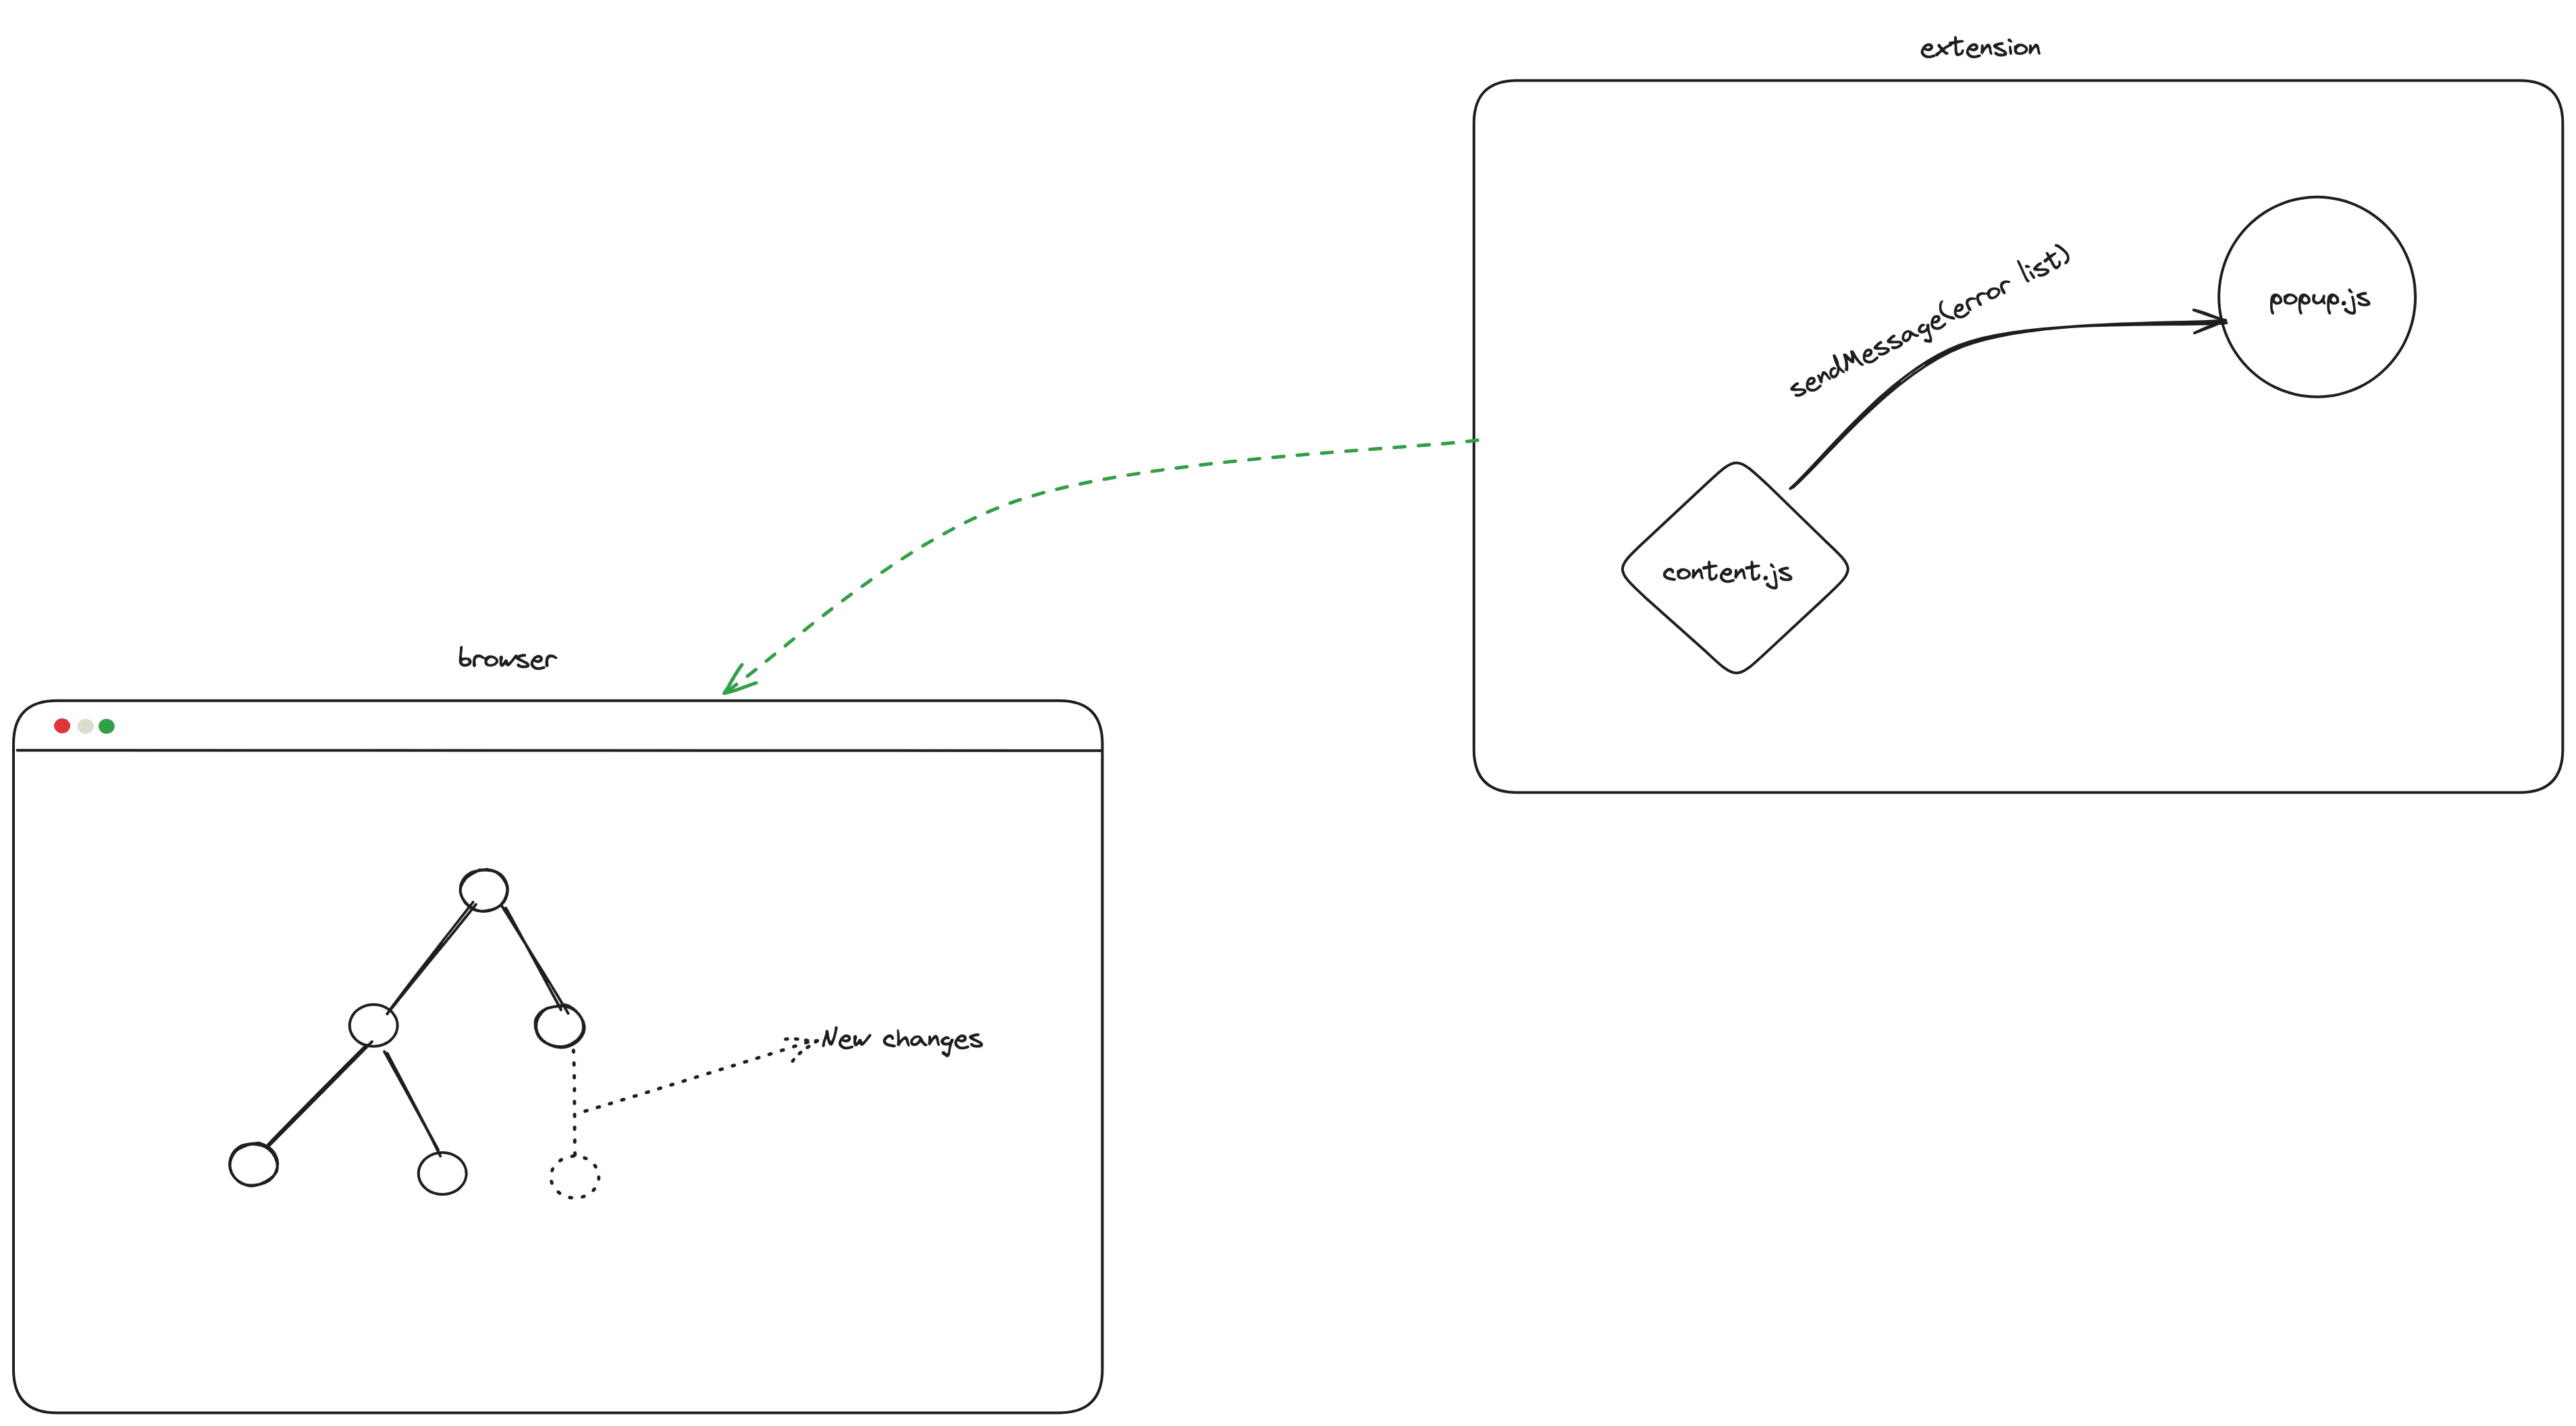
The client, implemented through content.js, continuously monitors the DOM for errors. Upon detecting any errors, it promptly dispatches a message to popup.js. Subsequently, popup.html is responsible for rendering the error message along with its associated link. This streamlined process ensures that users are promptly notified of any errors encountered, facilitating swift resolution.
Breakdown of the client
The root of the extension starts at the manifest.json. In here you define a couple of things we will need in our extension
{
    "manifest_version": 3,
    "name": "Talaria",
    "description": "An extension that enables developers to swiftly navigate to error lines within Visual Studio Code.",
    "version": "1.0",
    "action": {
      "default_popup": "popup.html"
    },
    "icons": {
      "16": "icons/icon-16.png",
      "48": "icons/icon-48.png",
      "128": "icons/icon-128.png"
    },
      "content_scripts": [
      {
        "js": ["src/js/content_script.js"],
        "matches": ["http://127.0.0.1/*", "http://localhost/*"]
      }
    ],
    "web_accessible_resources": [
      {
        "resources": ["src/js/*"],
        "matches": ["http://127.0.0.1/*", "http://localhost/*"]
      }
    ]
  }
popup.html: Render the popup page you see when you click on the icon.
content_scripts: Defines which sites we want our extensions to run on and the scripts to run on sites that matches our desired sites. In this case it get executed on pages whose url matches this pattern http://127.0.0.1/*,http://localhost/*.
web_accessible_resources: “Web-accessible resources are files inside an extension that can be accessed by web pages or other extensions. Extensions typically use this feature to expose images or other assets that need to be loaded in web pages, but any asset included in an extension's bundle can be made web accessible.”, according to the docs. But in our case it used a way to expose the scripts in the action directory. The content in the actions directory elaborated on later in this post.
Step-by-Step Walkthrough of the Chrome Extension
- Initialization in content_scripts.js:
The process starts with an asynchronous script that imports the core implementation logic from content.js :
This snippet imports content.js as a module, allowing for a modular structure where additional functionality can be easily imported as needed. The import syntax is particularly useful for managing dependencies and working with ES6 modules. Read more about importing ES6 module in chrome extensions here and also read about the import module here.(async () => { const src = chrome.runtime.getURL('src/js/content.js'); const contentScript = await import(src); contentScript.main(); })(); - Rationale for the Modular Approach
The extension imports code for different frameworks (like Vue and Next.js) into content.js . This approach is preferred for several reasons:
It keeps the core implementation file clean and manageable.
It allows for framework-specific logic to remain separate, simplifying future development and maintenance.
With frameworks having different implementation details, segregating the code helps reduce complexity.
By declaring these additional resources in the web_accessible_resources section of manifest , the extension ensures these files can be accessed within the current page context.
- Implementation in content.js
The extension detects which framework is being used by analyzing the port on which the development page is running. Using this information, it can apply framework-specific error handling.
The main logic in content.js involves importing framework-specific implementations and invoking the appropriate logic based on the detected framework.
Framework-Specific Handling
Next.js and React.js applications typically run on port 3000 or within a similar range. The extension uses this port information to identify if the application is a Next.js or React.js project.
To differentiate between the two, the extension checks if there's an iframe in the DOM. If an iframe is found, it's likely a React.js application. Otherwise, it's identified as a Next.js application.
Next.js uses a shadow DOM to display errors, a unique approach that isolates error styling from the main application's styles. However, this design choice can make error detection challenging, especially if scripts run after the DOM has been rendered.
To address this challenge, the extension uses MutationObserver to monitor changes in the DOM. It listens for changes in the class list, and if any class matches nextjs-portal , indicating the shadow root, it triggers the necessary error-handling code.
isNext()
In Next.js, error information is often embedded in an anchor a tag with the title "Click to open in your editor.". To locate this tag and extract the file name containing the error, theisNext function initiates a search through a series of operations that begin with a call to getErrorFile.
- Extracting the Error File
The getErrorFile function uses a MutationObserver to monitor the DOM for an element that contains the error link. Specifically, it looks for an element with a shadow root that has a child anchor tag with the title "Click to open in your editor.".
If found, it retrieves the file information from a nested span element. If the target element isn't found, it returns "Element not found."
- Finding the Line Number
To get the specific line and character position of the error, the getLineChar function is used. This function extracts text within parentheses to determine the exact location of the error within the file.
- Collecting and Sending Error Information:
With the full path and line number obtained, isNext creates an error object and adds it to an errors array. If the file is successfully found, the information is collected and then sent to the popup through a Chrome runtime message listener, allowing the extension to provide detailed error information when requested.
With this flow, the extension is designed to locate the error file, extract the full path, and find the exact line number where the error occurs. This information is then made available to the user, allowing them to quickly jump to the source of the problem within their text editor. The list of errors is sent as a message to the popup, providing users with a comprehensive view of all detected errors and their specific locations.
isReact()
In React, we search for an element containing the word Line in its text. This element serves as a reference point for retrieving the associated file information.
- Getting the line number
The line information is typically found in a span element with a text like Line 5:3: To extract the line number, we split the string at the word Line and then take the last segment.
After that, we remove the trailing colon ":" to get the line number. We then removed the trailing.
- Extracting the Error File
As previously mentioned, we use a span element as a reference point to locate the parent element. From this parent, the error file name is typically stored in its first child.
To extract the desired string, the getFile function employs a regular expression. This function searches for patterns within the text to isolate the relevant information. Using the match method, it identifies any text that contains a period . , indicating the likely location of the file name.
isVue()
The implementation for handling errors in Vue is simpler compared to Next.js but comes with its own intricacies. In Vue, errors are contained within an iframe, which serves a similar purpose as a shadow DOM by isolating the styling of the main application from the styling within the iframe. This technique is effective and less complex than other approaches.
To extract the error file name from a Vue error, the approach is straightforward: you just need to find the uelement within the iframe, which contains the name of the file where the error occurred. However, locating the specific line number related to the error requires more nuanced DOM traversal.
Here's the logic behind this process:
- Finding the iframe:
Start by querying all iframes on the page to locate the one containing the Vue error information. Typically, this will be the first iframe in the list.
- Extracting the File Name:
Within the iframe's content, locate all u elements. Each of these typically corresponds to a file name associated with an error.
- Locating the Line Number
The line number is found by navigating to a specific child node in relation to the u element with the error file name.
The required node is the child of the sibling of the parent of the u element, which has a specific CSS property—its opacity is set to 0.5.
After finding this node, extract its inner text, which should contain the line number.
After getting the errors, the same thing is done and the list of errors is sent as a message to the popup, providing users with a comprehensive view of all detected errors and their specific locations.
Server Side
We'll explore the functionality (server) vscode extension. This extension is responsible for handling incoming URIs, activating, restarting, and stopping the server, and directing users to specific files and lines within the VSCode workspace. Let's dive into the key components of the server-side implementation.
The MyUriHandler Class
At the heart of this implementation is the MyUriHandler class, which implements the vscode.UriHandler interface. This class defines the handleUri method, which is responsible for parsing incoming URIs and taking appropriate action.
Activating the Extension
To activate the extension, a command is registered that starts the server and initializes the MyUriHandler to process incoming URIs. The activate function sets up this command and also includes logic to handle server restarts and shutdowns.
The activate function handles the server lifecycle, allowing users to start, stop, and restart the server using appropriate commands. It also ensures that the UriHandler is registered, allowing the server to process incoming URIs.
Opening Files at Specific Lines
The openFile function is responsible for opening a specified file in VSCode and, if provided, navigating to a specific line. This functionality is crucial for directing developers to the exact location of an error or specific code.
async function openFile(file, line) {
  if (file) {
    const filePath = vscode.Uri.parse(`file://${file}`);
    const document = await vscode.workspace.openTextDocument(filePath);

    if (line && !isNaN(parseInt(line))) {
          await vscode.window.showTextDocument(document, {
            selection: new vscode.Range(
              parseInt(line) - 1,
              0,
              parseInt(line) - 1,
              0
            ),
          });
        } else {
          await vscode.window.showTextDocument(document);
        }
    }
}
This function opens the document at the specified line number (if provided and valid) or simply opens the document. This flexibility is essential for various use cases, from error tracking to code navigation.
Conclusion